Lip Piercing: Complete Guide to Types, Healing, Jewellery & Aftercare (2026)
Lip Piercing: Complete Guide to Types, Healing, Jewellery & Aftercare (2026)
Quick Answer: Lip piercings range from classic labrets to creative placements like Medusa and dahlia piercings. Healing takes 6–12 weeks depending on the type, requires twice-daily saline rinses, and works beautifully with labret studs, hoops, or shields. Choose high-quality surgical steel or titanium jewellery to prevent infection and ensure comfortable healing.
Introduction: Why Lip Piercings Remain a Bold Choice
Lip piercings have been a symbol of self-expression for decades, transcending fashion trends to become a timeless body modification. Whether you’re considering your first piercing or adding to an existing collection, understanding the different types, healing process, and aftercare is crucial for a safe, successful result.
At Camden Body Jewellery, we’ve helped countless customers navigate their lip piercing journey. This guide covers everything you need to know before, during, and after your piercing.
Understanding Lip Piercing Types: A Complete Overview
Lip piercings are incredibly versatile, with placements ranging from subtle to bold. Each type has its own healing timeline, pain level, and jewellery requirements. Let’s explore the main options.
The Complete Lip Piercing Types Comparison Table
| Piercing Type | Placement | Pain Level | Healing Time | Best Jewellery |
|---|---|---|---|---|
| Standard Labret | Centre of lower lip | 3–4 / 10 | 6–8 weeks | Labret studs, hoops |
| Vertical Labret | Vertically through lower lip | 4–5 / 10 | 8–10 weeks | Curved barbells |
| Monroe | Upper left lip, off-centre | 4–5 / 10 | 6–10 weeks | Labret studs |
| Madonna | Upper right lip, off-centre | 4–5 / 10 | 6–10 weeks | Labret studs |
| Medusa (Philtrum) | Centre of upper lip | 5–6 / 10 | 8–12 weeks | Labret studs |
| Ashley | Through inner lip into mouth | 5–6 / 10 | 10–12 weeks | Labret studs |
| Snake Bites | Lower lip, both sides | 4–5 / 10 | 6–10 weeks | Matching labret studs |
| Spider Bites | Lower left lip, side by side | 4–5 / 10 | 6–10 weeks | Matching labret studs |
| Dahlia | Corners of mouth, both sides | 5–6 / 10 | 8–12 weeks | Matching labret studs |
| Horizontal Lip | Horizontally through lip edge | 6–7 / 10 | 10–14 weeks | Curved barbells, shields |
Popular Lip Piercing Types Explained in Detail
Standard Labret
The standard labret is the most common lip piercing, placed vertically through the centre of the lower lip. It’s relatively quick to heal, genuinely comfortable, and works with virtually any jewellery style. Most people choose a labret stud for daily wear, though hoops and shields are equally popular.
Vertical Labret
A vertical labret pierces the lower lip vertically, creating a visually striking effect with visible jewellery on both the lip and the edge of the mouth. Healing takes slightly longer due to the angle, but the results are absolutely worth the extra week or two.
Monroe and Madonna
Monroe piercings sit on the upper left lip, replicating Marilyn Monroe’s famous beauty mark placement. Madonna piercings mirror this on the upper right side. Both are single piercings that work beautifully as standalone modifications or combined with other lip piercings for a bold statement.
Medusa (Philtrum)
The Medusa piercing sits at the centre of the upper lip, in the small groove between the nose and lip. Named for the mythological figure, it’s one of the more striking placements and requires careful jewellery selection to avoid irritation inside the mouth.
Ashley Piercing
Ashley piercings enter through the outer surface of the lower lip and exit inside the mouth. It’s a more advanced piercing that demands excellent aftercare due to the intraoral component. If you choose this placement, you’ll need to rinse after food and drink, and be mindful of your jewellery during eating.
Snake Bites and Spider Bites
Snake bites are two symmetrical piercings on the lower left and right sides of the lip. Spider bites are very similar but placed closer together on one side. Both create an edgy, striking aesthetic and are perfect for those who want a bolder statement with matching jewellery.
Dahlia Piercing
Dahlia piercings sit at the corners of the mouth on both sides, creating a dramatic symmetrical look. They’re named for the flower’s petal arrangement. Healing takes a bit longer due to the location, so patience is essential.
Horizontal Lip Piercing
A horizontal piercing cuts across the lip edge horizontally rather than vertically. It’s a less common placement that creates a unique visual impact and works best with curved barbells or lip shields.
Jewellery Materials: Choosing the Right Metal for Your Lip Piercing
Your choice of jewellery material directly impacts healing and comfort. Always prioritise biocompatible, non-reactive metals, especially during the initial healing phase.
Lip Piercing Jewellery Materials Comparison
| Material | Biocompatibility | Durability | Aftercare | Best For |
|---|---|---|---|---|
| Implant-Grade Titanium (ASTM F136) | Excellent; hypoallergenic | Very high | Minimal; just saline rinses | Initial healing; sensitive skin |
| Surgical Steel (316L) | Good; may contain nickel | High | Easy to clean | Everyday wear after healing |
| 18k Gold (solid) | Excellent if nickel-free | High | Mild soap and water | Fully healed piercings; luxury pieces |
| Glass | Excellent; inert | Moderate; fragile | Very easy to clean | Sensitive piercings; short-term wear |
| Niobium | Excellent; hypoallergenic | Very high | Simple saline rinses | Healing; very sensitive skin |
| Acrylic/PTFE | Good; plastic-based | Lower; prone to scratching | Simple but requires care | Temporary piercings only |
| Plated Metals (silver, gold plating) | Fair; plating wears off | Low | Frequent cleaning needed | Not recommended for piercings |
Why Titanium and Surgical Steel Win for Lip Piercings
Implant-grade titanium (ASTM F136) is the gold standard for healing piercings. It’s completely hypoallergenic, resists corrosion, and won’t leach metals into the piercing channel. Surgical steel (316L) is an excellent, affordable alternative once your piercing has fully healed, provided you’re not nickel-sensitive.
Avoid plated metals and low-quality alloys during healing. The constant movement and exposure to saliva, blood, and lymphatic fluid can strip plating and expose reactive base metals underneath.
The Lip Piercing Healing Timeline: What to Expect Week by Week
Week 1: The Inflammation Phase
Expect swelling, redness, and tenderness. Your mouth and lips may feel tight. This is completely normal and indicates your body is responding to the piercing. Swelling peaks around day 2–3.
What to do: Rinse with saline 2–3 times daily, especially after eating and drinking. Apply ice packs for 5–10 minutes several times per day to reduce swelling. Avoid hot, spicy, crunchy, and acidic foods. Don’t touch or play with your jewellery.
Week 2–3: Active Healing
Swelling should begin to subside. You may notice slight discharge (clear, whitish, or pale yellow) - this is normal lymphatic fluid, not infection. Pain diminishes significantly by day 10–14.
What to do: Continue saline rinses twice daily. Slowly reintroduce soft foods. Be mindful when brushing your teeth to avoid bumping the piercing. Sleep on your back if possible to avoid pressure.
Week 4–6: Surface Healing Completes
External swelling resolves. The piercing feels much more settled. However, internal tissue is still fragile and vulnerable to irritation.
What to do: Continue saline rinses daily. You can now wear different jewellery if you wish, but avoid dangling pieces that move excessively. Keep the piercing clean and dry.
Week 7–12: Deep Tissue Maturation
This is when the deeper tissue channel fully strengthens. The piercing may feel healed externally, but internal tissue is still developing. Most lip piercings complete this phase within 8–12 weeks, though some take up to 16 weeks depending on the exact placement.
What to do: Continue saline rinses once daily. Avoid submerging in water (pools, baths). Treat the piercing gently. If everything feels comfortable, you can slowly reduce aftercare frequency.
Month 3 onwards: Stability
Once fully healed, your lip piercing becomes remarkably stable. Most people can wear virtually any jewellery without issue, provided it’s clean and high-quality.
Complete Lip Piercing Aftercare: A Practical Guide
Daily Aftercare Routine
Saline Solution Rinses (2–3 times daily during healing)
Use a sea salt and distilled water solution (0.9% sodium chloride). You can purchase pre-made sterile saline solution, or make your own by mixing 1 teaspoon of non-iodised sea salt in 250ml of cooled, boiled water. Never use table salt or tap water, which contain impurities and chlorine.
Apply the saline with a clean cotton pad or spray bottle. Let it sit for 30 seconds, then gently rinse. Do this after meals, before bed, and once in the middle of the day.
What NOT to Do During Healing
- Don’t remove the jewellery except to clean it (and only after the first few days if the piercer approves)
- Don’t sleep on the pierced side of your face
- Don’t eat hot, spicy, crunchy, or sticky foods that irritate the channel
- Don’t swim or submerge in water for at least 2 weeks
- Don’t use alcohol, peroxide, or antibiotic ointments (they kill beneficial bacteria)
- Don’t share eating utensils, drinks, or lip products
- Don’t engage in oral contact or kissing for at least 5–7 days
- Don’t use mouthwash containing alcohol; ask your dentist for alcohol-free alternatives
- Don’t twist, turn, or play with your jewellery
- Don’t let untrained hands touch the piercing
Food and Drink Considerations
For the first 1–2 weeks, stick to cool, soft foods: yoghurt, smoothies (room temperature), mashed potatoes, cottage cheese, scrambled eggs, soups (cooled), and soft fruits like bananas. Avoid anything that requires vigorous chewing or might irritate the channel.
Once initial swelling subsides, you can gradually return to normal foods, but continue avoiding extremely hot items and crunchy foods that might catch on the jewellery.
Oral Hygiene During Healing
Brush your teeth gently, being careful not to bump the piercing. Consider using a softer toothbrush temporarily. If your jewellery rests on your gum line or inside your mouth, create a gentle barrier with a clean finger or cotton pad while brushing.
If you use mouthwash, ensure it’s alcohol-free, as alcohol dries the piercing and can disrupt healing.
When to Worry: Signs of Infection
Most lip piercings heal smoothly, but know the warning signs. Infection is rare when you follow proper aftercare, but if you notice excessive pain that doesn’t improve after a few days, pus (yellow, green, or thick discharge), or swelling that worsens after day 3, contact your piercer or doctor.
A small amount of clear or whitish-yellow lymphatic discharge is normal and not infection.
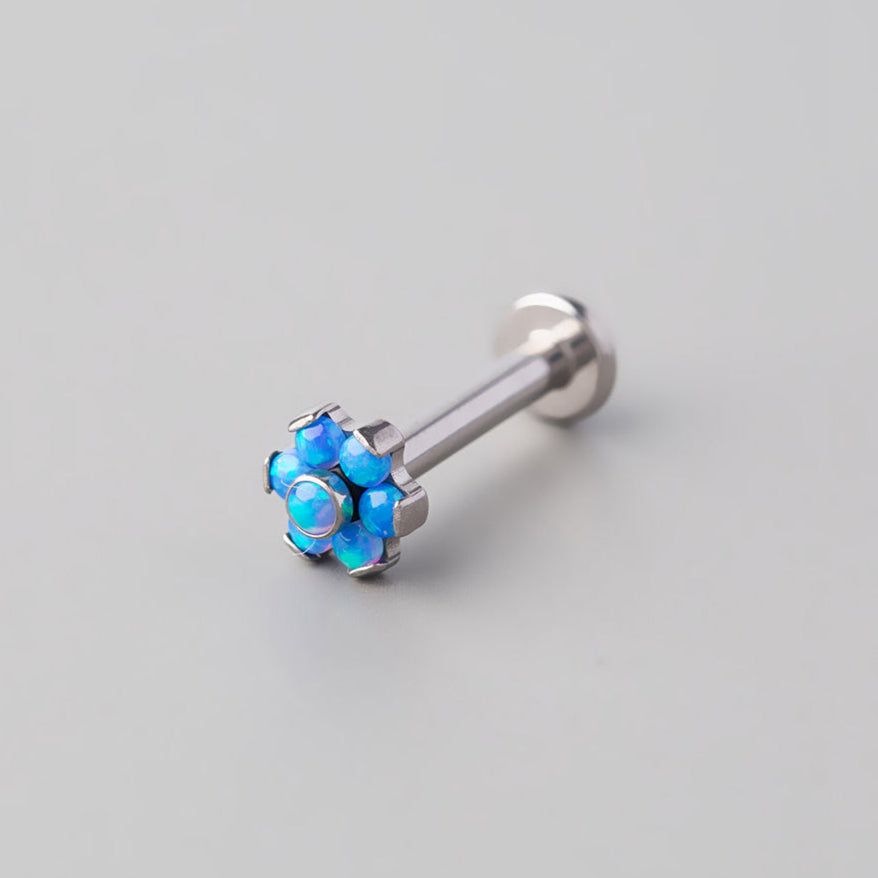
Lip Piercing Jewellery: Types and Styles
Labret Studs
The most popular choice for lip piercings. A labret stud features a straight barbell with a flat back that sits inside the mouth and a decorative end that shows externally. You can choose from countless designs: stones, gems, pearls, skulls, minimal discs, or ornate pieces. They’re versatile, comfortable, and suitable for work and social settings if you select appropriately.
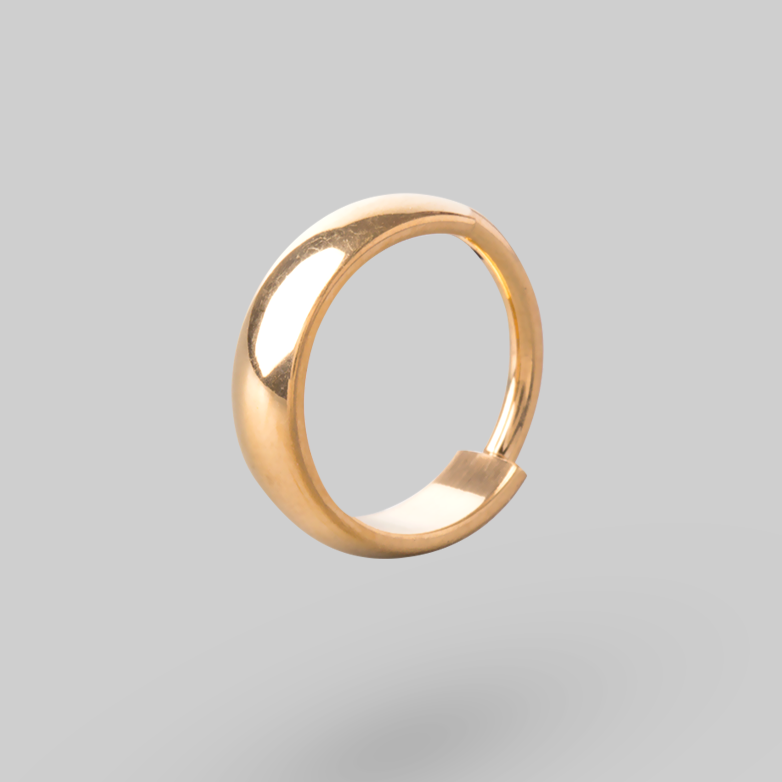
Hoops (Segment and Continuous)
Once healed, hoops offer a softer, more casual aesthetic. Segment rings (with a removable clicker) are easier to insert and remove. Continuous rings are seamless and slightly more discreet. Both work beautifully for lip piercings, though they require gentle handling during the healing phase.
Shields and Crescents
Lip shields sit flat against the outer lip surface with a bar holding them in place. They create a unique, fashionable look and work particularly well for vertical labrets. Crescents are similar but shaped like a crescent moon.
Curved Barbells
Essential for vertical labrets and horizontal lip piercings. The gentle curve follows the contour of the lip and prevents excessive movement during healing. They come in various gauges and lengths.
Choosing the Right Gauge and Length
Standard lip piercings use 1.2mm (16g) or 1.6mm (14g) gauge. Your piercer will determine the appropriate gauge based on your lip anatomy. The jewellery length must be slightly longer during healing to accommodate swelling, typically 6.5mm to 8mm. Once healed, you can downsize to 6mm or 5mm for a snugger fit.
Never use oversized jewellery long-term, as it can cause migration and damage to the piercing channel.
Frequently Asked Questions About Lip Piercings
1. How much does a lip piercing hurt?
Most people describe lip piercing pain as a quick pinch followed by pressure. Pain levels range from 3–6 out of 10, depending on the exact placement and your personal pain tolerance. Standard labrets and Monroes are the least painful (3–4/10). More complex placements like horizontal lip piercings and dahlias score higher (5–7/10). The anticipation is usually worse than the actual sensation.
2. Can I change my lip jewellery immediately after piercing?
No. During the initial healing phase (first 6–8 weeks), avoid changing your jewellery except when necessary for cleaning. Removing and reinserting jewellery disrupts the forming channel and increases irritation and infection risk. Once fully healed (8–12 weeks), you can safely change jewellery whenever you wish.
3. Will my lip piercing leave a scar if I remove it?
Lip piercings typically leave minimal scarring if removed after full healing. The lip has excellent blood flow, which aids healing. If you remove the jewellery within the first few months, the hole may close quickly and relatively invisibly. Older piercings may leave a slight mark, particularly if the piercing was large or the jewellery was heavy.
4. Can I get a lip piercing if I have braces or dental work?
Yes, but with caution. Inform your piercer and dentist about your plans. Avoid lip piercings that sit inside the mouth (like Ashley piercings) during orthodontic treatment, as braces and jewellery can interfere. Standard labrets and Monroe piercings usually work fine. Be extra vigilant with aftercare and oral hygiene, and avoid jewellery with sharp edges that might catch on wires or brackets.
5. What’s the difference between infection and normal healing discharge?
Normal discharge during healing is clear, whitish, or pale yellow and appears in small amounts. It’s lymphatic fluid, not pus. Infection discharge is thick, green, yellow, or foul-smelling, accompanied by significant pain, warmth, and swelling that worsens after day 3. If unsure, contact your piercer or doctor for peace of mind.
6. Can I swim or shower with a new lip piercing?
Avoid swimming, hot tubs, and submersion for at least 2 weeks. Chlorine and saltwater introduce bacteria and irritants. Brief showers are fine if you rinse the piercing afterwards with saline. After 2–3 weeks, gentle swimming in clean water is usually safe, though many piercers recommend waiting until full healing (8–12 weeks).
7. Will a lip piercing affect my speech or eating?
Temporarily, yes. Most people experience minor lisp or speech changes for the first few days due to swelling and adjustment. This resolves within a week as swelling subsides and you adapt. Eating is slightly awkward for the first 1–2 weeks, but sticking to soft foods minimises issues. Once healed, most people forget their lip piercing exists during everyday activities.
8. Can I get multiple lip piercings at once?
You can, but most reputable piercers recommend spacing them out. Getting 2–3 piercings in one session is usually safe, but more than that puts excessive stress on your body and complicates aftercare. Spacing piercings 4–6 weeks apart allows each to heal independently and lets your body recover between sessions. This also gives you time to ensure you’re comfortable with aftercare before adding more piercings.
9. How do I know if my lip piercing is infected?
Infection signs include: thick, coloured discharge (green, yellow, or brown); increasing pain beyond day 3; warmth and redness that spreads; swelling that worsens; fever; or foul odour. Minor irritation, mild swelling, and clear discharge are normal during the first 2 weeks. If symptoms persist or worsen, contact your piercer or doctor immediately. Infections are rare with proper aftercare but require prompt attention if they occur.
10. Can I wear makeup around my lip piercing during healing?
Avoid heavy makeup on and immediately around the piercing during the first 4–6 weeks. Makeup products can introduce bacteria and irritants into the healing channel. Once healing is well underway (after 6 weeks), you can carefully apply lip products around the piercing, but keep the jewellery itself makeup-free. Always use clean brushes and applicators, and wash your hands before touching the area.
Key Takeaways: Your Lip Piercing Checklist
- Choose the right type: Standard labrets and vertical labrets are easiest to heal. More complex placements like dahlias and horizontal piercings take longer but look stunning.
- Invest in quality jewellery: Implant-grade titanium and surgical steel (316L) are non-negotiable during healing. They prevent infection and complications.
- Follow the 8–12 week rule: Most lip piercings need 8–12 weeks to fully heal, with some placements requiring up to 16 weeks. Patience prevents setbacks.
- Saline rinses are essential: 2–3 rinses daily during the first 4–6 weeks remove bacteria and support healing. Don’t skip them.
- Avoid common irritants: Skip hot foods, spicy foods, swimming, harsh mouthwash, and touching the piercing during healing.
- Know the infection signs: Thick discharge, increasing pain, warmth, and spreading redness warrant immediate medical attention.
- Aftercare matters more than the initial piercing: The first week is important, but consistent aftercare over 8–12 weeks determines success.
Lip Piercing Jewellery at Camden Body Jewellery
At Camden Body Jewellery, we specialise in high-quality lip piercing jewellery suitable for every stage of your journey. Whether you’re freshly pierced and need implant-grade titanium studs or you’re fully healed and exploring decorative options, we’ve got you covered.
Our Labret and Lip Piercing Collections
Shop our full range of labret studs and lip piercing jewellery: Browse our dedicated labret and lip piercing collection for hundreds of designs in various materials, gauges, and lengths. From minimalist steel studs perfect for workplace wear to ornate pieces with stones and gems, you’ll find exactly what suits your style and healing stage.
Explore our Labret and Lip Piercing Jewellery Collection
Medusa Piercing Jewellery
Specialised pieces for Medusa (philtrum) piercings: Medusa piercings require carefully designed studs that don’t irritate the soft tissue inside your mouth. Our Medusa collection features biocompatible materials and designs specifically chosen for comfort and healing.
Browse our Medusa Piercing Collection
Check our website for current pricing, material options, and our full range of designs. Our team is always happy to answer questions about materials, sizing, and aftercare recommendations.
Read Next: Deepen Your Piercing Knowledge
Ready to learn more about body jewellery and piercing care? Explore these related articles:
- Complete Body Jewellery and Piercing Aftercare Guide - Comprehensive aftercare strategies for all piercing types.
- Threadless Labrets: How and Why They’re a Game Changer - Why threadless (internally threaded) jewellery is superior for healing and comfort.
- Best Materials for Piercings: A Complete Material Guide - Detailed breakdown of every metal and material used in quality body jewellery.
Final Thoughts: Your Lip Piercing Journey Starts Here
Lip piercings are a bold, beautiful way to express yourself. Whether you choose a classic labret or a striking dahlia placement, proper aftercare and quality jewellery ensure a smooth healing journey and years of enjoyment. Trust the process, be patient during healing, and don’t hesitate to reach out to your piercer if anything feels off.
At Camden Body Jewellery, we’re here to support you every step of the way with expert advice and premium jewellery designed for comfort and beauty. Happy piercing.
Stop The Reaction Before It Starts
90% of piercing irritation comes from poor quality metal. Upgrade to ASTM F-136 Implant Grade Titanium-the biocompatible gold standard used by professional piercers worldwide.
Myths vs. Reality
Myth: "Itchiness means infection."
False. Infection usually involves throbbing pain, heat, extreme swelling, and yellow/green pus. Mild itching alone is rarely an infection.
Myth: "Turn the jewelry to scratch the itch."
Never twist! Twisting breaks the healing seal, introduces bacteria inside the wound, and extends healing time by weeks.
Why Shop Camden?
-

Implant Grade Titanium
ASTM F-136 Compliant
-

Tracked UK Delivery
Free over £40
-

Sterilised Piercing Jewellery
Keeping your skin safe